
 English

Views: 0 Author: Site Editor Publish Time: 2025-11-04 Origin: Site


You want to polish stones and see them sparkle, right? Shiny rocks look amazing on a shelf or in your pocket. If you ever wondered how to make rocks shiny, you can try a few simple tricks at home. You just need to know how to polish rocks using sandpaper, toothpaste, or even baby oil. There’s an easy way to make rocks shiny, and you don’t need fancy tools. Grab your favorite stones and get ready to make rocks shiny with a little effort and patience.
Get important supplies like sandpaper, Aluminum Oxide, and towels to polish stones at home.
Follow steps: clean the stones, sand them with different grits, and use Aluminum Oxide to make them shiny.
You can try things like baby oil or toothpaste for a fast shine if you do not have much time.
Do not make mistakes like polishing too much or forgetting to clean, so your stones look great.
You can also use other ways like tumbling or resin spray to make your stones very shiny.
Before you start making your stones shiny, you need to gather a few supplies. You don’t have to spend a lot of money. Most items are easy to find at hardware stores or online. Let’s break down what you’ll need for hand polishing and what you can use for extra shine.
You want to get the basics first. Here’s a list to help you get started:
Sandpaper (220, 500, and 1200 grit): These help you smooth out rough edges and scratches. You start with the lowest grit and work your way up.
Aluminum Oxide 1200: This polishing compound gives stones a glossy finish. Many rock collectors use it for hand polishing.
Toothpaste: You can use it for a quick shine if you don’t have polishing compounds.
Dremel tool: If you want to speed up the process, a Dremel with buffing wheels works well.
Buffing and polishing wheels: These attach to your Dremel or drill and help you polish faster.
Diamond-based polishing compounds: These work best for very hard stones.
Absorbent towels: You need these to dry and clean your stones between steps.
Tip: You don’t need every tool on this list. Start with sandpaper, Aluminum Oxide, and a towel for basic hand polishing.
If you want your stones to look even shinier, try these extras:
Baby oil: Rub a little on your stone for a wet look.
Resin spray: This adds a protective, glossy layer.
Borax: Use it in a burnishing wash for extra shine.
Iron Out: This cleaner removes stains and brings out color.
MB-20 Granite Polish: Many people say it improves granite’s shine by up to 30%.
Bonastre polishing pads: These pads work with just water and are eco-friendly.
Cerium (IV) Oxide: Experts recommend this for agate and quartz because it gives a superior polish.
You can experiment with these products to see which ones work best for your stones. Some people like the natural look from hand polishing, while others prefer a high-gloss finish.
You want to know how to polish rocks and make them shine, right? Let’s walk through the steps for hand polishing. You don’t need fancy machines. You just need patience and a few simple tools. This method works great if you want to polish stones at home and see results fast.
Before you start to polish rocks by hand, you need to clean and prep your stones. Dirt, grit, and other stuff can mess up your final shine. Here’s what you should do:
Gather your rocks, sandpapers (from 60 up to 1200 grit), a rag, and some car wax.
Wash your stones with warm water and a brush. Scrub away any mud or loose bits.
Check for soft inclusions, cavities, or trapped grit. These can cause pits or blemishes when you polish stones.
Dry your rocks with an absorbent towel. Make sure there’s no moisture left.
Tip: If you see any deep holes or cracks, try to clean them out as much as possible. Grit stuck inside can scratch your stone later.
Now you’re ready to sand your rocks. This is the most important part of hand polishing. You want to start rough and finish smooth. Here’s how to polish rocks step by step:
Begin with the lowest grit sandpaper (like 60 or 120). Rub your stone in circles. This shapes the rock and removes big scratches.
Move up to finer grits: 180, 240, 320, and so on. Each grit makes the surface smoother.
Spend extra time with the highest grit (like 1200). This is where you start to see a shine.
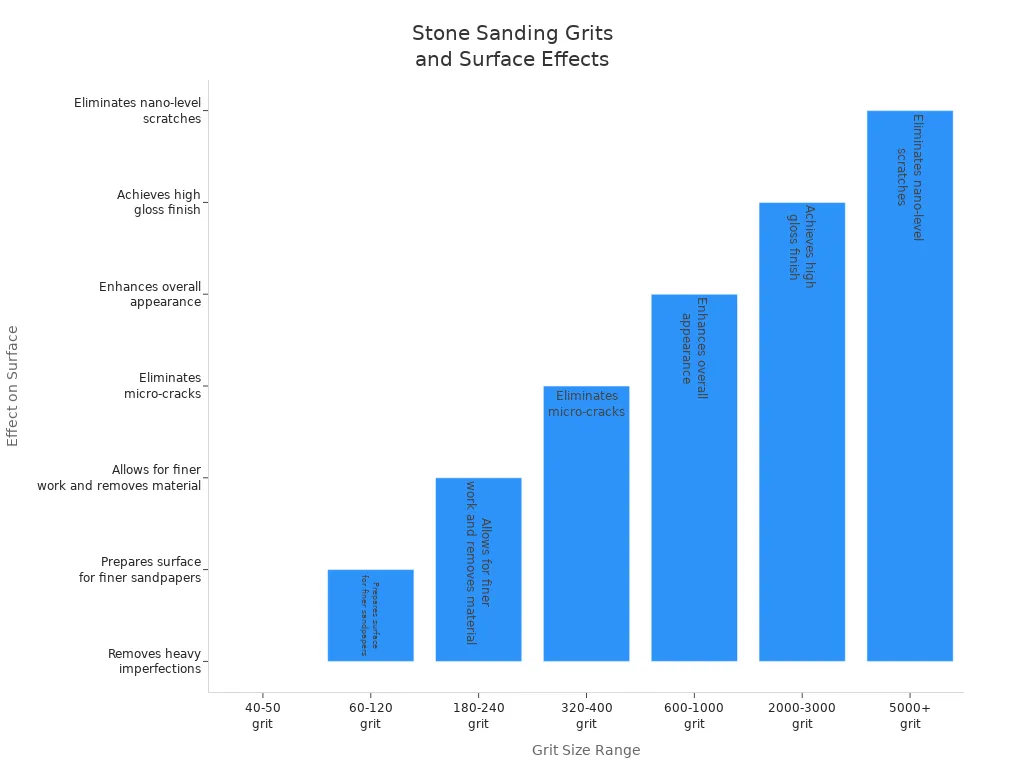
Check out this table to see how different grit sizes affect your stone:
Grit Size Range | Purpose | Effect on Surface |
|---|---|---|
40-50 grit | Pre-treating hard stone | Removes heavy imperfections |
60-120 grit | Basic grinding | Prepares for finer sandpapers |
180-240 grit | Secondary finishing | Removes more material |
320-400 grit | Pre-polishing | Eliminates micro-cracks |
600-1000 grit | Matte finish | Enhances appearance |
2000-3000 grit | Mirror polishing | High gloss finish |
5000+ grit | Ultra-fine polishing | Nano-level scratch removal |
Note: If you want to polish rocks by hand, don’t rush the sanding. The smoother you get your stone, the shinier it will look later.
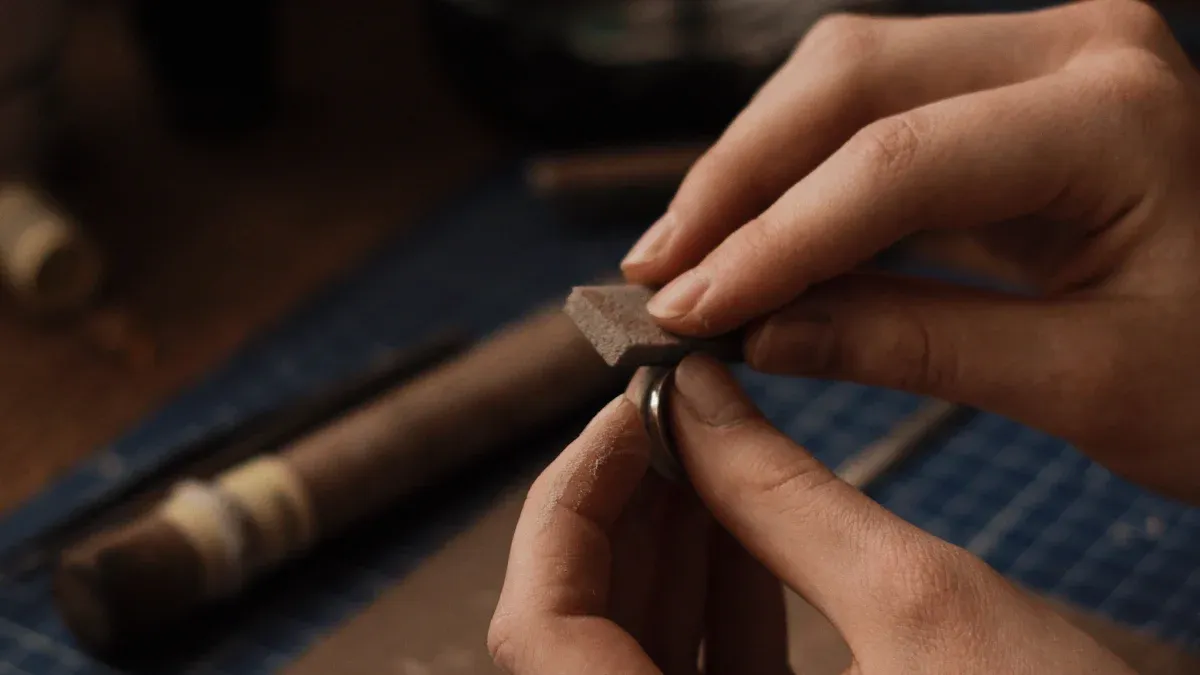
When your stone feels smooth, it’s time for the final polish. Aluminum Oxide 1200 is a favorite for hand polishing. You just need a little bit and a soft rag.
Sprinkle a small amount of Aluminum Oxide on your stone.
Rub it in with a clean rag, using circular motions.
Keep polishing until you see a mirror-like shine.
Aluminum Oxide works so well because it’s hard and abrasive. It removes tiny scratches and gives your stone a glossy finish. Some people use tin oxide or cerium oxide for special stones, but Aluminum Oxide is great for most rocks.
Safety Alert: Always wear an N95 mask and goggles when you polish stones with Aluminum Oxide. Use gloves and keep your workspace ventilated. Dust can be harmful if you breathe it in.
If you want to know how to polish rocks quickly, you can use household items. Baby oil and toothpaste work for a fast shine, especially if you’re short on time.
Put a drop of baby oil on your stone. Rub it in with a soft cloth. This gives a wet look and makes colors pop. Just remember, polishing rocks with oil can attract dust if you use too much.
Squeeze a little toothpaste onto your stone. Buff it with a rag. Toothpaste has mild abrasives that help polish rocks by hand.
Here’s a quick look at the pros and cons of using baby oil:
Pros of Baby Oil | Cons of Baby Oil |
|---|---|
Safe for skin | Can discolor granite over time |
Doesn’t damage stone integrity | Attracts dust if used excessively |
Tip: If you have a Petoskey stone, you can keep the wet look by rubbing in a thin layer of baby oil every few weeks. This helps preserve the shine and makes the fossil pattern stand out.
Hand polishing is easy once you get the hang of it. You just need to know how to polish rocks step by step. Try different methods and see which one works best for your stones. You’ll be amazed at how shiny your rocks can get!
You might wonder if there are faster or easier ways to make rocks shiny besides hand polishing. Let’s look at some popular methods that can help you get that glossy finish.
Rock tumblers do most of the work for you. You just load your stones, add grit, and let the machine spin. Tumbling works best for agate, jasper, quartz, and other semi-precious stones. Here’s how the process goes:
Coarse grind: Shape rough edges with coarse grit.
Medium/fine grind: Smooth the surface and remove scratches.
Pre-polish: Get the stones ready for their final shine.
Final polish: Buff the rocks until they reflect light.
Check out this table to see how tumbling compares to hand polishing:
Method | Time Required |
|---|---|
Tumbling | 1 to 2 weeks |
Hand Polishing | Generally takes longer |
Tumbling saves you time and effort, but you still need patience. If you want to know how to make rocks shiny with less work, tumbling is a great choice.
Burnishing is like giving your stones a spa day. After tumbling, you add borax and water, then let the stones spin for a few days. Borax helps clean off leftover polish and boosts the shine. Use about 1/2 tablespoon of borax for every pound of rocks in a rotary tumbler. Many rock collectors say burnishing makes a big difference, especially for hazy stones.
Borax improves luster and cleans polish from crevices.
Burnishing in soapy water for several days can make rocks shiny and bright.
Tip: If your stones look dull after tumbling, try a borax wash. You might be surprised by the results!
Want a super shiny, glass-like finish? Resin spray can help. Epoxy resin creates a hard, protective layer that resists scratches, water, and sunlight. The colors in your stones will pop! Here are some pros and cons:
Pros: Resin cures to a tough, high-gloss finish. It protects stones from wear and tear.
Cons: You need to mix it carefully and work in a ventilated area. Some resins release fumes and take a long time to dry. The shine may fade with regular handling, so you might need to reapply.
If you want to make rocks shiny for display, resin spray works well. Just remember to follow safety instructions.
Iron Out is a cleaner that removes stains and brings out color fast. You soak your stones in a solution, then rinse and dry them. Always wear gloves and work in a well-ventilated space. Silica dust and chemicals can be dangerous, so use protective gear.
Silica dust can cause breathing problems.
Some stones may contain asbestos, which is harmful.
Power tools and chemicals need careful handling.
Safety first! Always use a mask, gloves, and good ventilation when you polish stones with chemicals.
Trying different methods helps you learn how to make rocks shiny in new ways. Pick the one that fits your style and enjoy your sparkling stones!
You want your stones to look their best, but some mistakes can ruin the shine. Here are things you should watch out for:
Over-polishing: If you polish softer stones too much, you might damage them. Use a gentle touch and stop when you see a nice shine.
Wrong grit selection: Using the wrong sandpaper grit can leave streaks or make the surface uneven. Always start with coarse grit and move to finer ones.
Skipping cleaning: Dirt and grit can scratch your stones. Wash and dry them before you start polishing.
Using abrasive materials: Rough cloths or pads can scratch the surface. Pick a soft, lint-free cloth for the final polish.
Improper storage: If you toss shiny stones together, they can scratch each other. Store each stone in a pouch or a box with compartments.
Polishing with hair products or makeup on: These can dull the shine. Remove jewelry before using personal care products.
Neglecting to dry stones thoroughly: Water left on stones can cause tarnishing. Dry them with a soft towel.
Skipping protective gear: Gloves and masks keep you safe from dust and chemicals. Always wear them when you polish.
Ignoring stone type: Petoskey stones are soft and need gentle hand polishing. Agate and jasper are harder and work best with tumbling.
Tip: A clean, smooth surface helps your polishing pads work better and gives you a brighter finish.
If you’re just starting, you can follow these steps to get shiny stones every time:
Wash your rocks with light soap and water. Dry them in the sun.
Place your rocks in a jar and pour in mineral oil until they’re covered.
Cover the jar and let the rocks soak for at least two hours.
Strain the oil using a strainer.
Wipe off extra oil with a paper towel.
Use an absorbent towel to polish each rock for extra shine.
You should pick the right method for your stone. Agate and jasper are great for tumbling and give a bright polish. Petoskey stones are softer, so hand polishing with sandpaper works best.
Remember: Take your time and check your stones often. You’ll see better results and avoid common mistakes.
You have learned the key steps and supplies for polishing stones. Here’s a quick look at what you need:
Supplies | Description |
|---|---|
Sandpaper | Smooths rough edges |
Aluminum Oxide | Adds glossy finish |
Microfiber cloths | Cleans and buffs stones |
Painter’s tape | Protects surfaces |
PPE | Keeps you safe |
Try different methods and see which one works best for your rocks. You might notice that the more you polish, the shinier your stones get. Keep practicing and enjoy watching your stones sparkle!
You can expect to spend about 30 minutes to an hour on each stone. Softer rocks take less time. Harder stones need more sanding and polishing.
Most rocks can get shiny with the right method. Very soft or crumbly stones may break apart. Try agate, jasper, or quartz for best results.
Yes, you can use toothpaste and baby oil for a quick shine. Always wash your hands after polishing. Avoid using harsh chemicals on stones.
You should wear gloves and a mask when sanding or using chemicals. Safety glasses protect your eyes from dust. Good ventilation helps keep you safe.
Oils and polishes can wear off with handling. You can reapply baby oil or polish to restore the shine. Store your stones in a dry place.


 No.351, Dingshi Jing, Shijing, Dongling Town, Huian, Quanzhou, Fujian, China
+86-595-86780371
+86-15905012435


